 NAVISCREEN
Setup guide, step by step
The setup is done once and takes about five minutes. You need your Android phone (Android 11 or newer) and any Wi-Fi for those five minutes — at home, at work or a friend's hotspot. The app shows every step itself; this page repeats them with pictures for when something isn't clear. Menu names differ a little between phone brands.
1Open NaviScreen and allow notifications
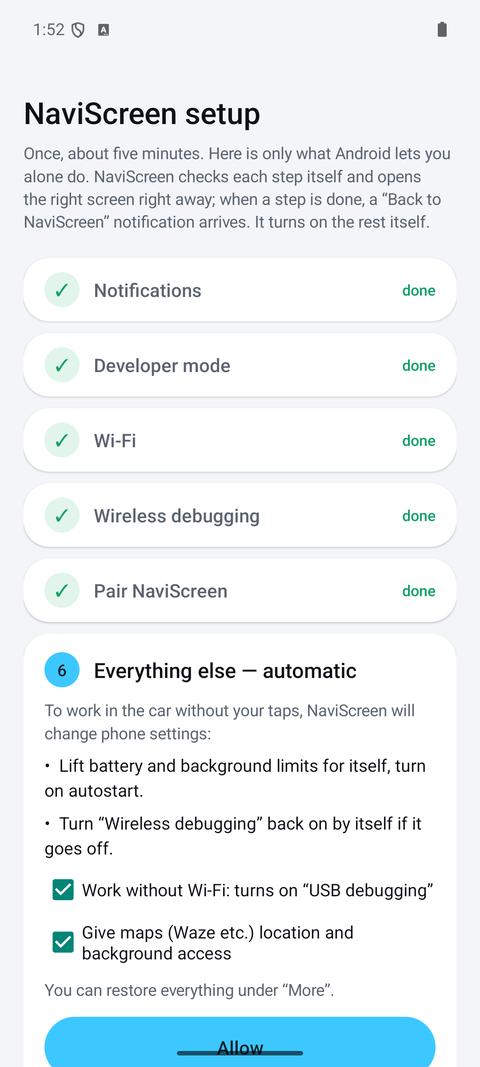
Install NaviScreen from Google Play and open it. You'll see a list of six steps. Steps that are already done are marked “done” and green.
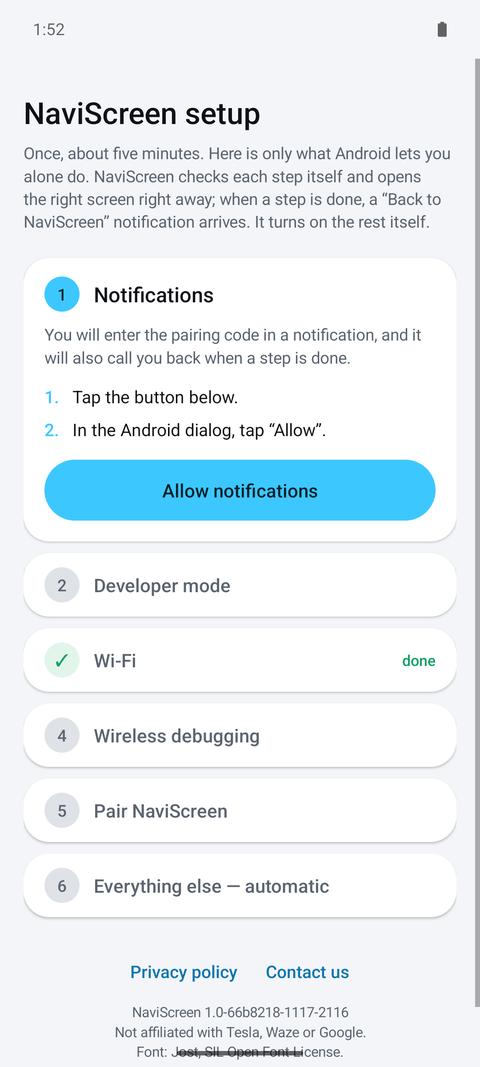
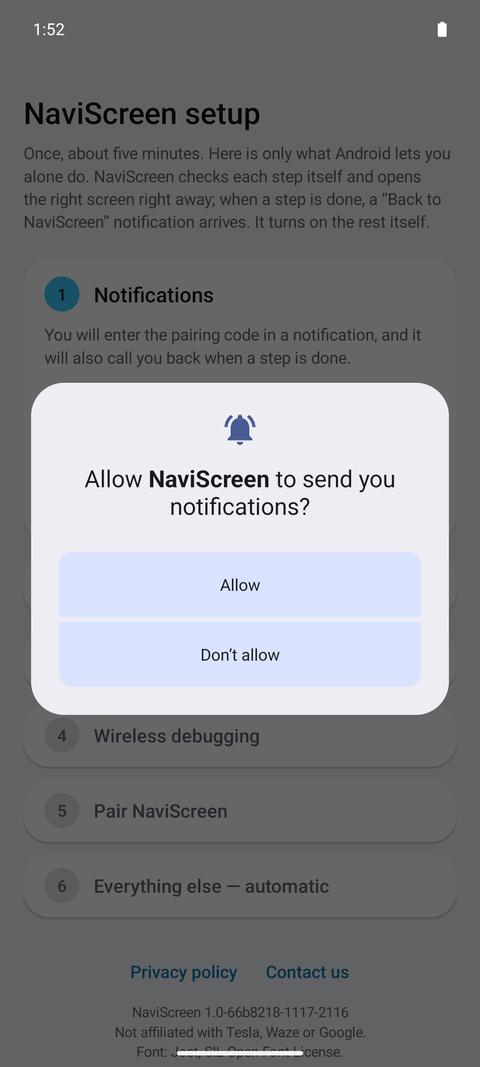
Tap Allow notifications, then Allow in the Android window. NaviScreen needs notifications: you'll type the pairing code into one, and they tell you when a step is done.
2Turn on developer mode
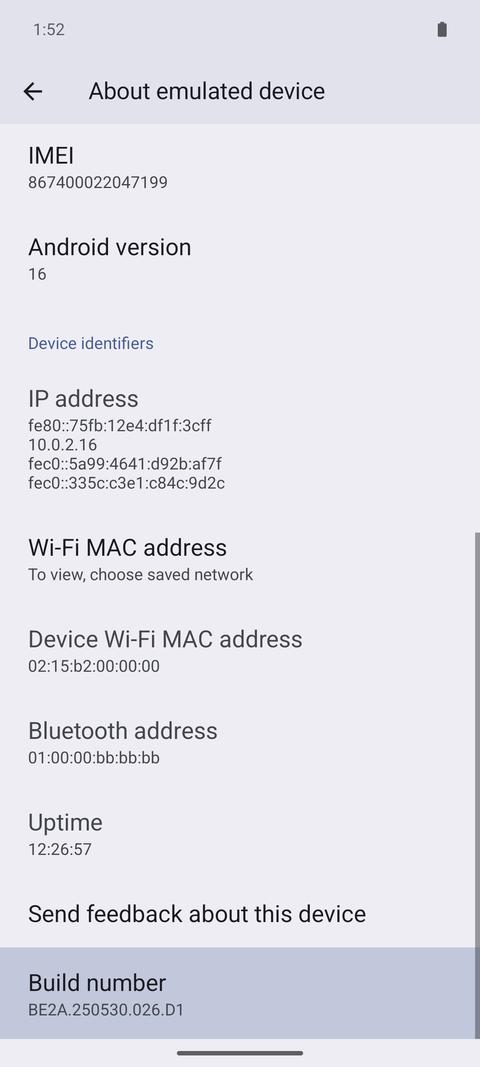
This is a hidden section of Android settings. Without it Android won't let an app create a separate screen for the car. It doesn't change anything else on the phone. Tap Open “About phone”.
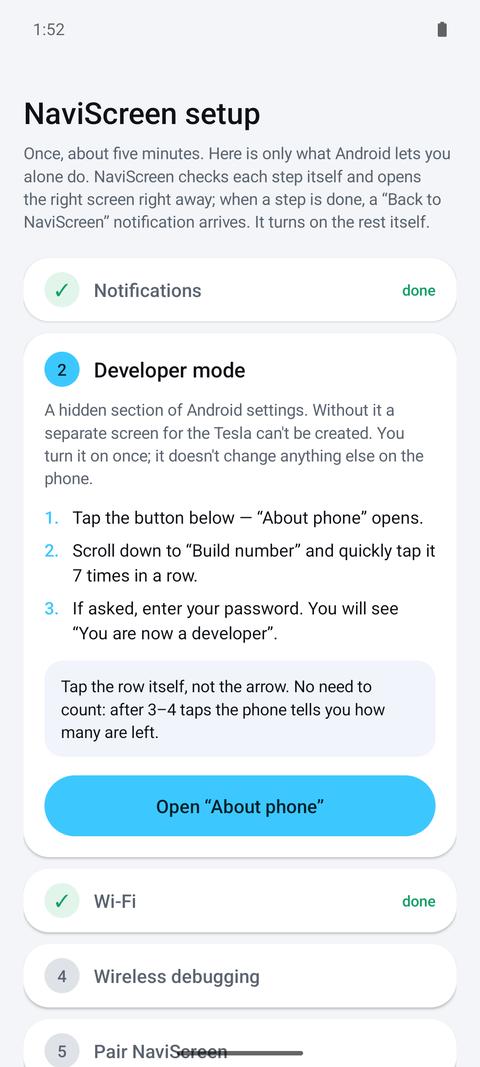
The “About phone” page opens with the right row highlighted. Quickly tap Build number 7 times in a row (on Xiaomi it's MIUI version; on Samsung open Software information first). If asked, enter your screen-lock PIN. You'll see “You are now a developer”. Then go back to NaviScreen — a notification will offer to take you there.
3Connect to any Wi-Fi
Android turns on wireless debugging only on Wi-Fi, so for the setup the phone must be connected to any Wi-Fi network. No Wi-Fi nearby? Ask someone to turn on a hotspot on their phone. After the setup NaviScreen works on mobile data.
4Turn on Wireless debugging
Back in NaviScreen, step 4 explains what to do. Tap Open developer options at the bottom of the card.
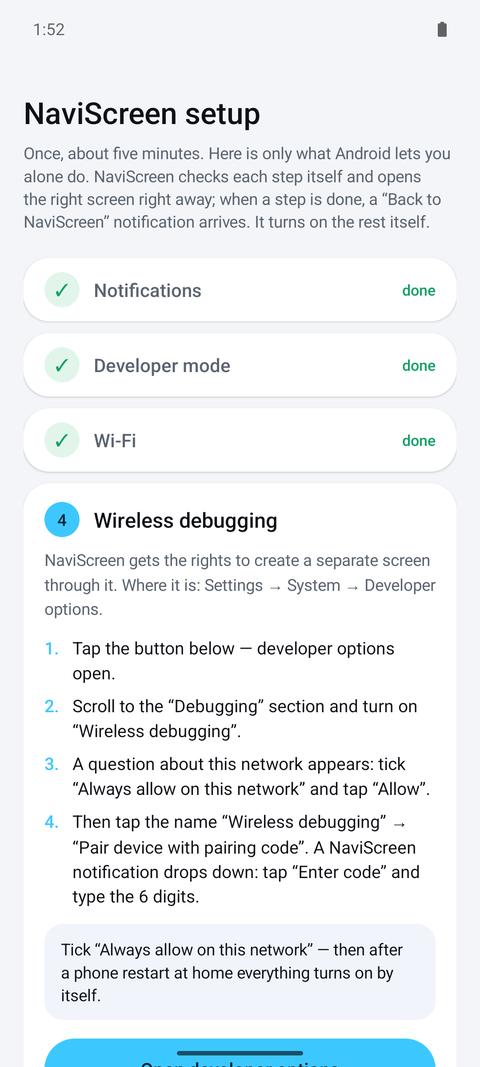
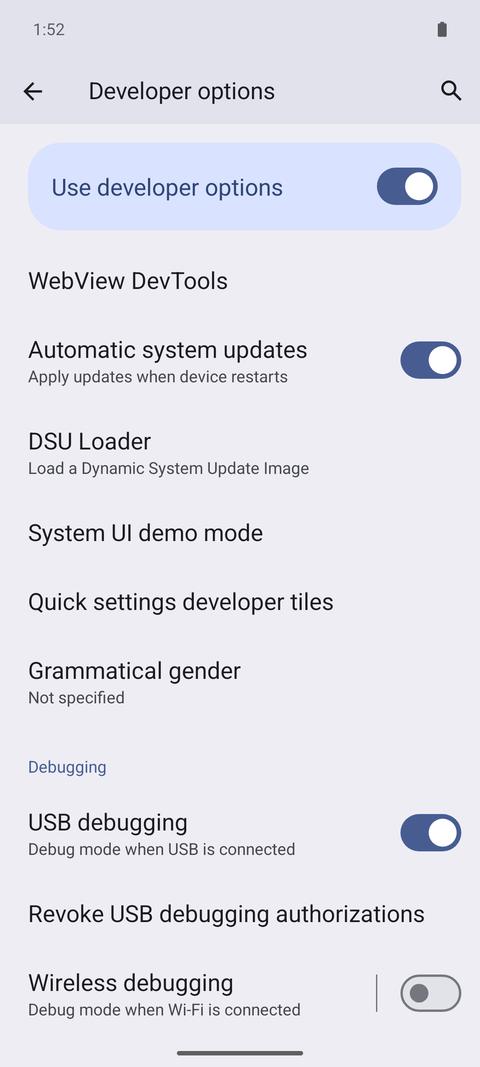
Developer options open. Scroll to the Debugging section and turn on the Wireless debugging switch.
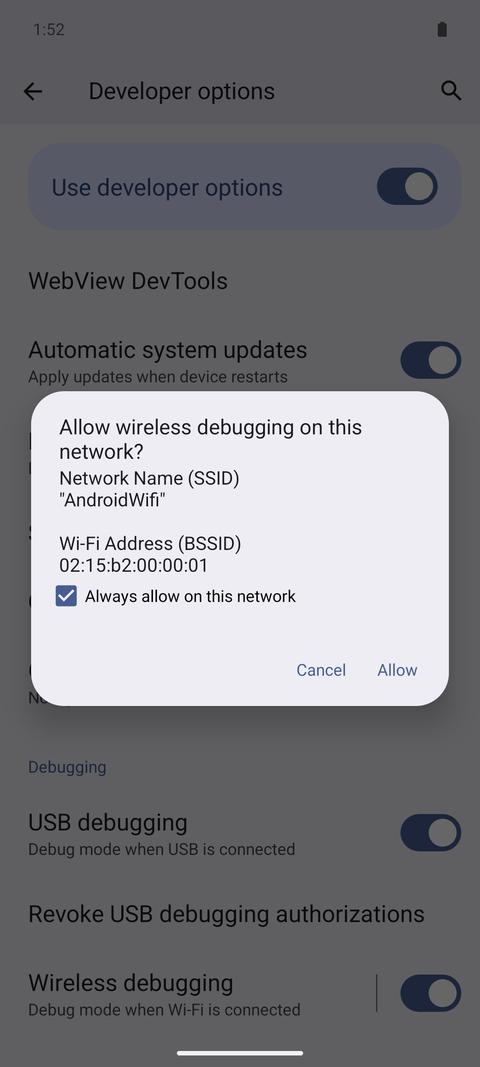
Android asks about this network. Tick Always allow on this network and tap Allow. With the tick, everything comes back by itself after a phone restart at home.
5Pair NaviScreen with the 6-digit code
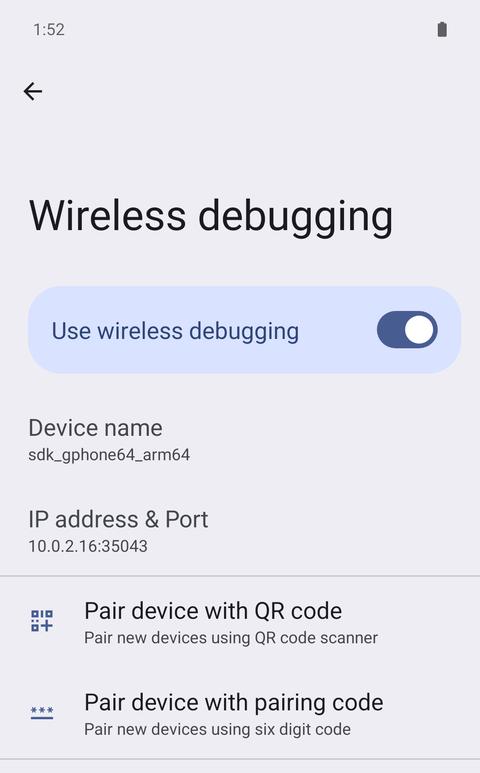
Now tap the name “Wireless debugging” (the words, not the switch). This page opens. Tap Pair device with pairing code.
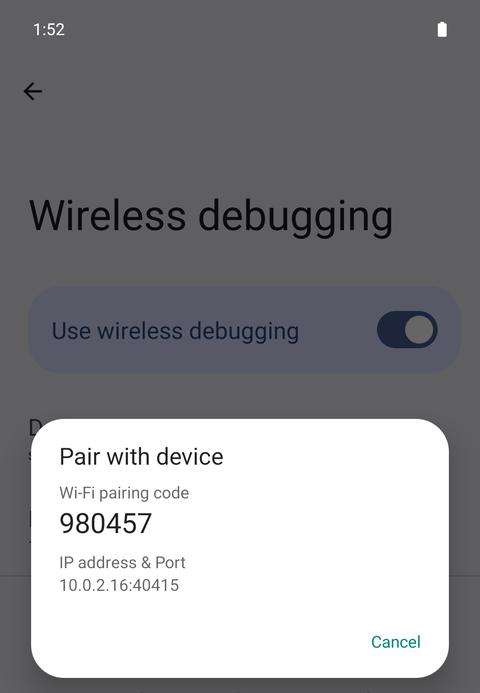
Android shows a 6-digit code. Keep this window open.
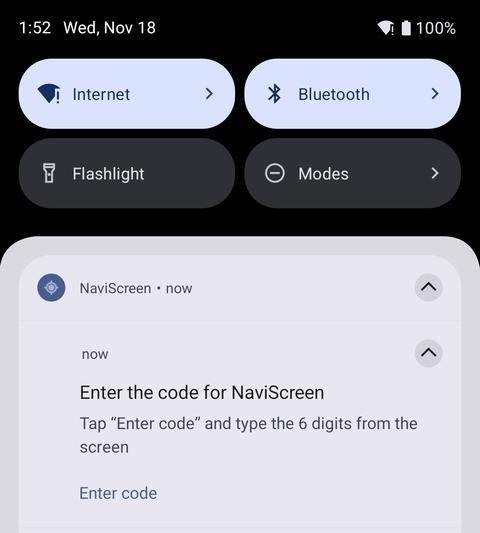
Swipe down from the top of the screen. Find the NaviScreen notification Enter the code for NaviScreen and tap Enter code. If you only see a short line, tap the little arrow on the right to expand it.
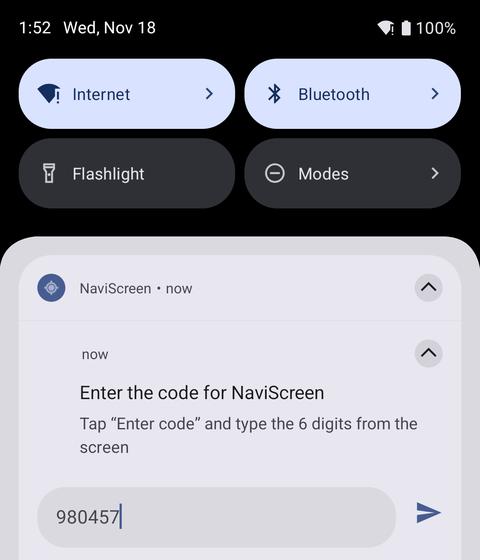
Type the 6 digits from the Android window and tap the arrow to send. After a few seconds the code window closes by itself and NaviScreen says the step is done.
6Let NaviScreen do the rest
The last card lists what NaviScreen will set up so it works in the car without your taps: battery limits off for itself, autostart, and turning Wireless debugging back on if it goes off. Tap Allow. You can undo all of it later under “More” → “Restore everything”.
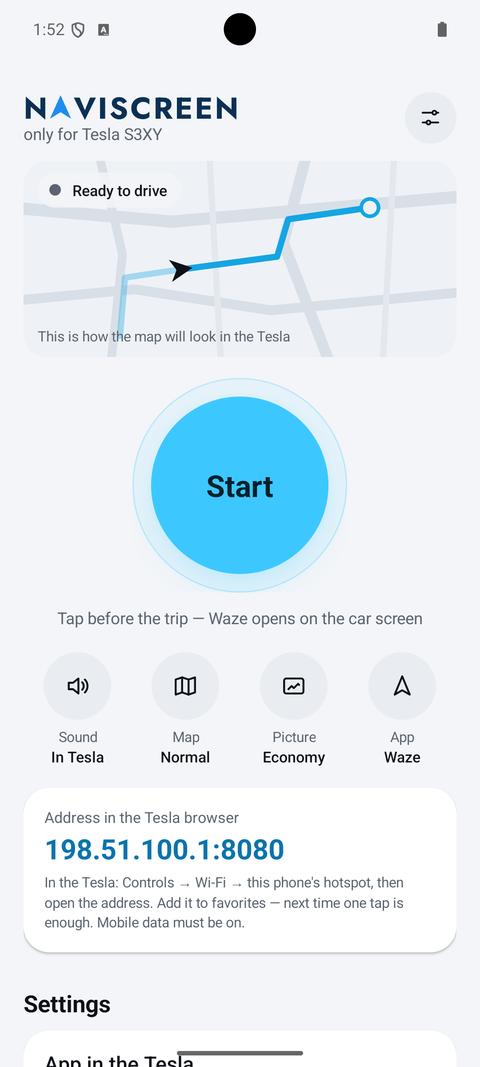
Done. This is the main screen: the big Start button, the navigator to show (Waze by default — tap App to change it) and the address for the car: 198.51.100.1:8080.
7In the Tesla
Make sure mobile data is on in the phone. NaviScreen turns on the phone's hotspot when you start it.
In the car tap Controls → Wi-Fi and choose your phone's hotspot. Enter its password once; the car remembers it.
Open the Browser on the Tesla screen and type 198.51.100.1:8080 in the address bar. The map appears. Save the page to favourites — next time one tap is enough, and NaviScreen usually starts by itself when you get in.
If something doesn't work
I tapped “Build number” and nothing happens
Tap the row itself, not the arrow, and tap quickly. After 3–4 taps the phone shows how many taps are left. On Xiaomi tap “MIUI version”; on Samsung open “Software information” first.
There's no “Wireless debugging” in developer options
Your phone needs Android 11 or newer. Check that the phone is connected to Wi-Fi, not only to mobile data.
The “Enter code” notification doesn't appear
Swipe down from the top of the screen and look for NaviScreen. If notifications are blocked, allow them for NaviScreen in Android settings. On some phones it helps to open settings and NaviScreen side by side in split screen so the code window doesn't close.
The code was not accepted
The code changes every time the window opens. Close it, tap “Pair device with pairing code” again and enter the new code quickly.
The car doesn't see the phone's hotspot
Turn on mobile data on the phone: the car doesn't join a hotspot without internet. In NaviScreen settings use “Restart the hotspot for the Tesla”.
The page doesn't open in the Tesla browser
Check that the car is connected to the phone's hotspot (not to home Wi-Fi) and that you typed 198.51.100.1:8080 exactly. Tap Start in NaviScreen if it isn't running.
Still stuck?
In NaviScreen open “More” → “Contact us”: it prepares an email with the app's technical log, which you see before sending. Or write to ltd.tariro@gmail.com.